Port forwarding on AirPort Extreme
From AssaultWiki
| |
This article will only be helpful to Mac OSX users. Viper |
Assigning a static internal IP
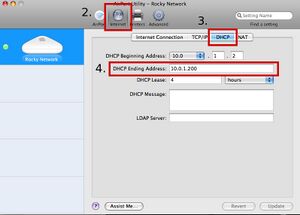
- Open up Airport Utility, find your device, and hit "Manual Setup"
- Click the Internet tab
- From there, click the DHCP tab
- Find DHCP Ending Address. The first 3 values (i.e. the 10.0.1) will remain the same in your internal IP address (the address from which the ports will be forwarded, NOT your external IP). The last value (in this case 200) will be ONE number higher for your internal IP. Copy this number
- Minimize Airport Utility.
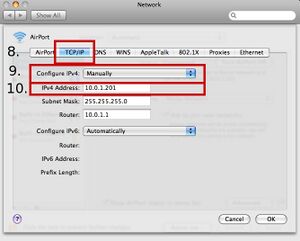
- Open up System Preferences and navigate to Network, located under Internet and Network
- Select your AirPort device on the left hand side of the page, and then click Advanced...
- Hit the TCP/IP tab
- Go to Configure IPv4 and select Manually
- You should now be able to enter an address into the IPv4 Address field. Type your internal IP here.
- Remember that your internal IP is ONE digit higher than your DHCP Ending Address.
- For example, my DHCP Ending Address is 10.0.1.200 My IPv4 Address is therefore 10.0.1.201
- Click "OK" and then "Apply"
Note: If during step 8, you are asked to re-assign your Subnet Mask or Router look back to Using DHCP and copy those numbers into the now empty fields.
Forwarding the ports
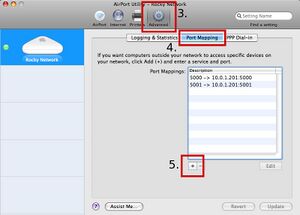
- Re-open AirPort Utility
- Select your device and hit "Manual Setup"
- Click "Advanced"
- Pull up the "Port Mapping" tab
- Hit the "+" button
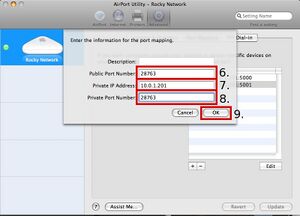
- In the "Public Port Number" field write in the default server port, 28763
- Make sure that the Private IP Address (your static internal IP) is entered correctly
- In the "Private Port Number" field write in the default port, 28763
- Hit "OK"
- Repeat steps 5-9 for the second default port needed for extra data transfer: 28764
- Click "OK" and then hit "Update"


